
In my last post about the Pecron solar generator I mentioned picking up the portable solar panel that goes with it. However the way I’m using it to power the radio station it makes sense to install some regular solar panels for daily use to save on wear and tear on the portable system.
The eventual goal is to install a solar tracker to maximize the amount of sun. Solar trackers are supposed to capture about 40% more sun than stationary south facing panels. The system I will install is from Eco-Worthy. It has 6 100W bifacial panels. Bifacial panels differ from standard panels as they are able to generate power from both sides of the panel. Therefore it’s good to get them in the air where they can absorb sun from reflections. They should perform well in the winter when there is snow on the ground. Panels like this would be wasted being mounted on a roof. There has even been a lot of experimenting with them facing east and west where they are able to take advantage of morning and afternoon sun.
The issue is where to install this array? We have very tall trees to the south south-west that are the neighbors that shade a significant amount of the back yard in the afternoon. Putting panels on the house or in the front yard is not an option. So I’ve embarked on a quest to find the best location by building a small portable solar system that I can move around the yard to test solar production.
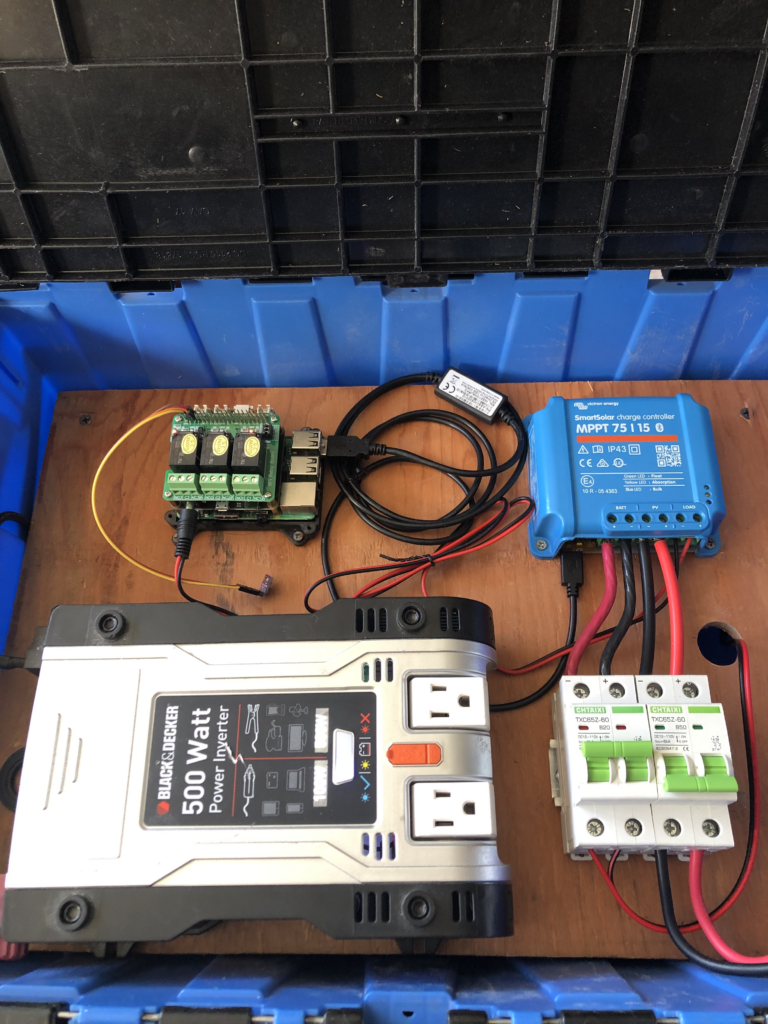
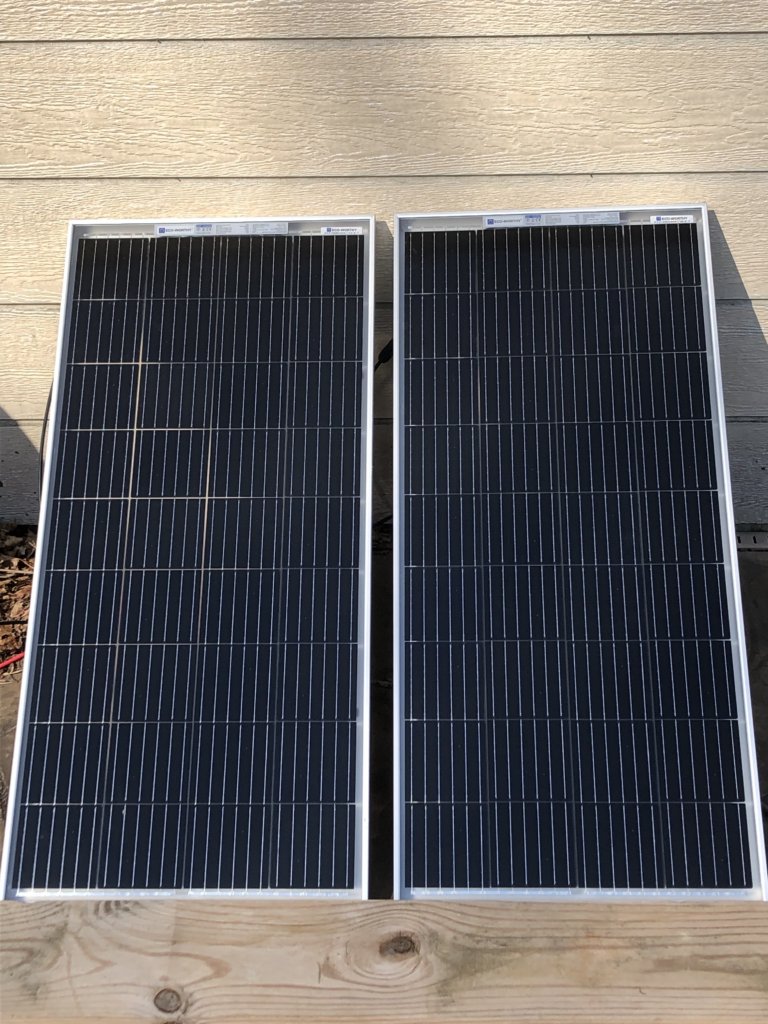
What I’ve done is take an old storage create and made a small portable solar generator. It’s based on the Victron MPPT 75/15 controller. The reason with going with Victron is they have great tools that allow you to monitor in realtime what’s going on with the system. But more importantly it also has data logging so we can see the system performance. This is done through their Cerob/Venus GX controllers which run just under $300. Fortunately the Venus OS is available as open source software so I’m able to get it running on a Raspberry Pi which ran about $40. Whole lot cheaper! I used a 20aH AGM battery from a UPS, an old 500W AC inverter and added a couple of breakers to turn off the battery and solar panels when necessary. I attached the create to a small dolly so I can move it around the yard. I’m using 2 of the 6 100W panels from the tracker as the solar input. Right now I have them leaning against the pool house but plan to use some of the racking that came with the tracker and make a little frame that I can put wherever I want to test. When I’m done I can repurpose this equipment to actually install a home solar system or lots of other uses.

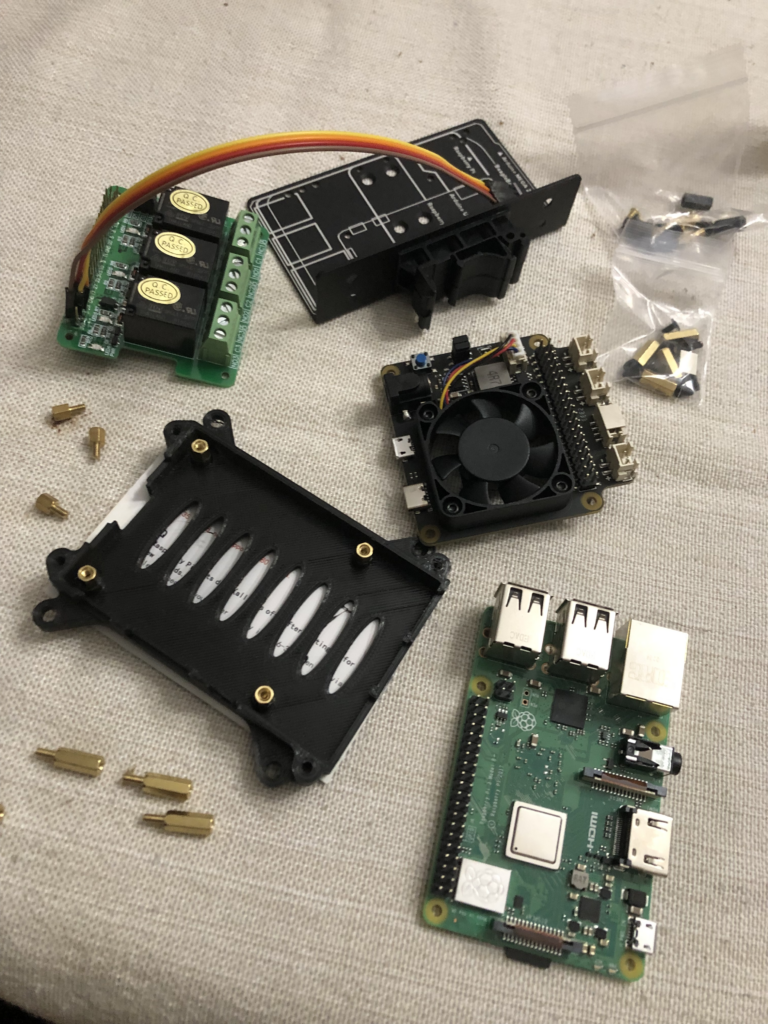
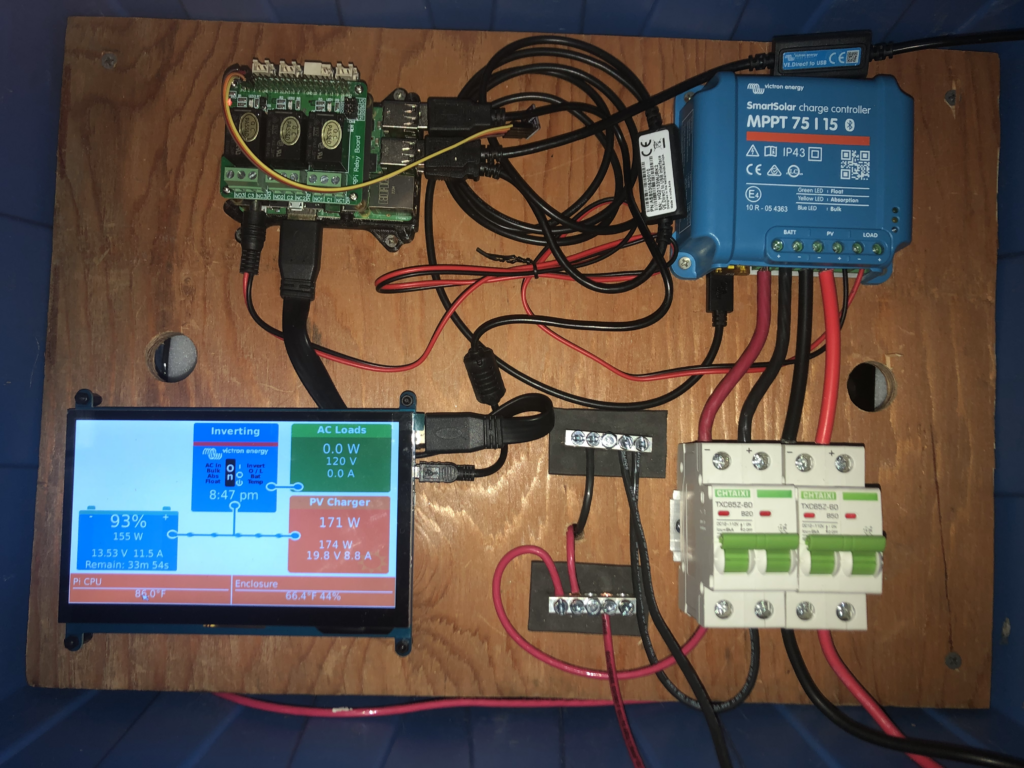
The brains the system is a Pi 3B+. I’ve added a power management hat so I can safely take in 6-30V and not damage the Pi it also has a fan to keep the Pi cool. On top of that is a triple relay board which can be controlled by VenusOS. The relays can be programmed to perform a number of preset functions or they can be set to manual and turned on/off in the app. They can also be controlled by NodeRed which is also installed. The only unfortunate thing was that I had intended to mount the Pi on a DIN rail mount. Unfortunately the power management hat connectors for SATA drives and other devices gets in the way. I ended up just 3D printing a base as a mount.
So the quest begins to find a good spot. Now if we could just get some sun…
Your wish is my command!
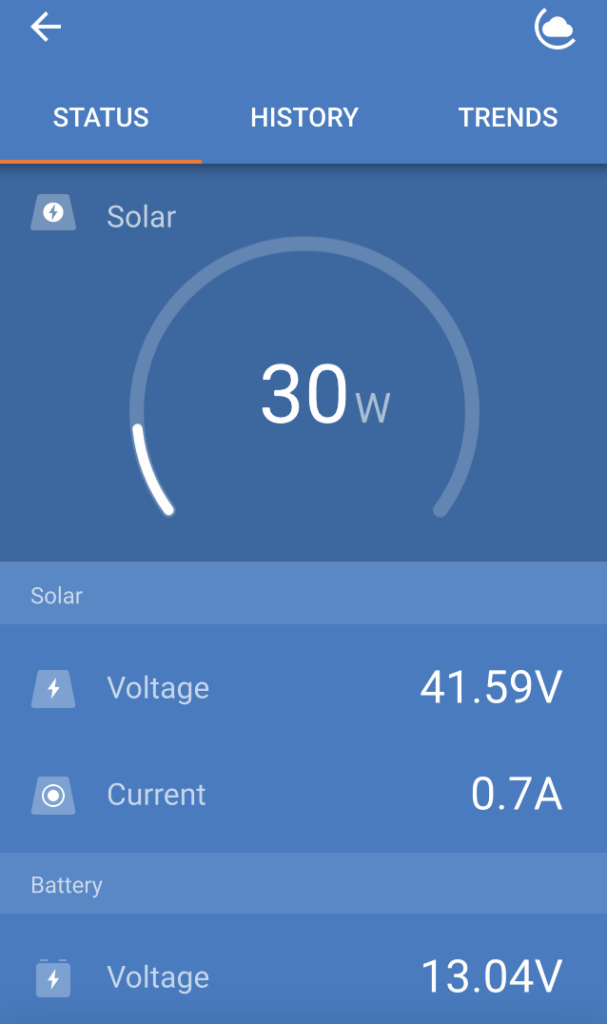
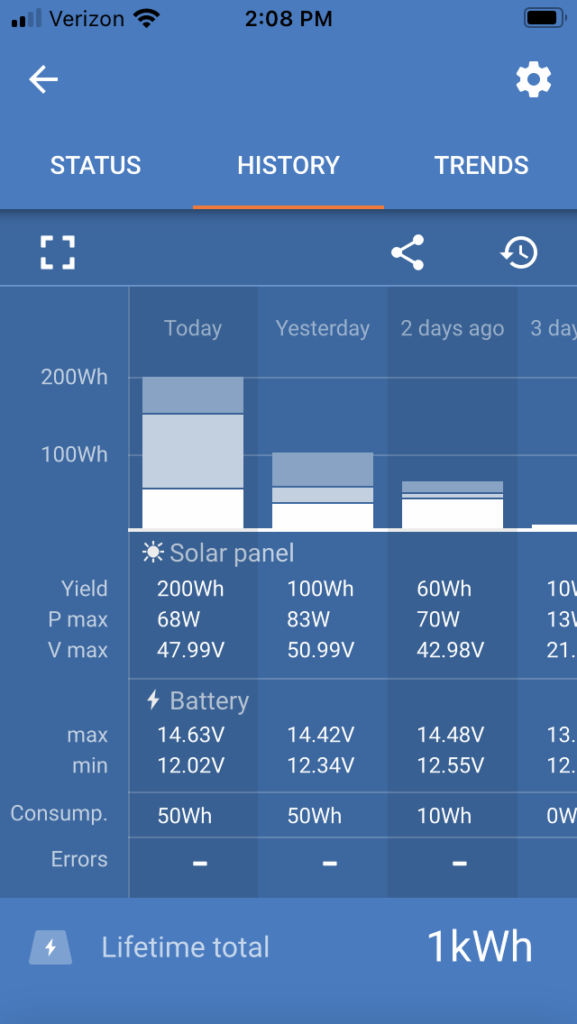
So today (3/12) was the first time in weeks the sun was out. It almost hit 60°F and was sunny so it was a perfect time to test out the system. Plugged everything in and was immediately dissapointed with the solar generation. The voltage looked good at 41.59V but the amperage was low at 0.7A giving me a total of 30W.
I was totally lost as to what was going on. These 2 panels in series should theoretically put out 200W. Now it’s unlikely that you will often, if ever, get the full power out but 30W is not even close. Each panel has a max V of 20.2 and max A of 4.95 which would theoretically generate 99.9W.
Then it dawned on me! I was not generating enough load. The only thing consuming power was the battery charging which was already close to full, a couple of watts for the Pi and whatever the inverter uses. Apparently that totaled only the 30W. So I ran in and grabbed 4 lamps and the most inefficient bulbs I could find. A couple old 100W bulbs and two heat/grow floods. I plugged them in and what a difference.
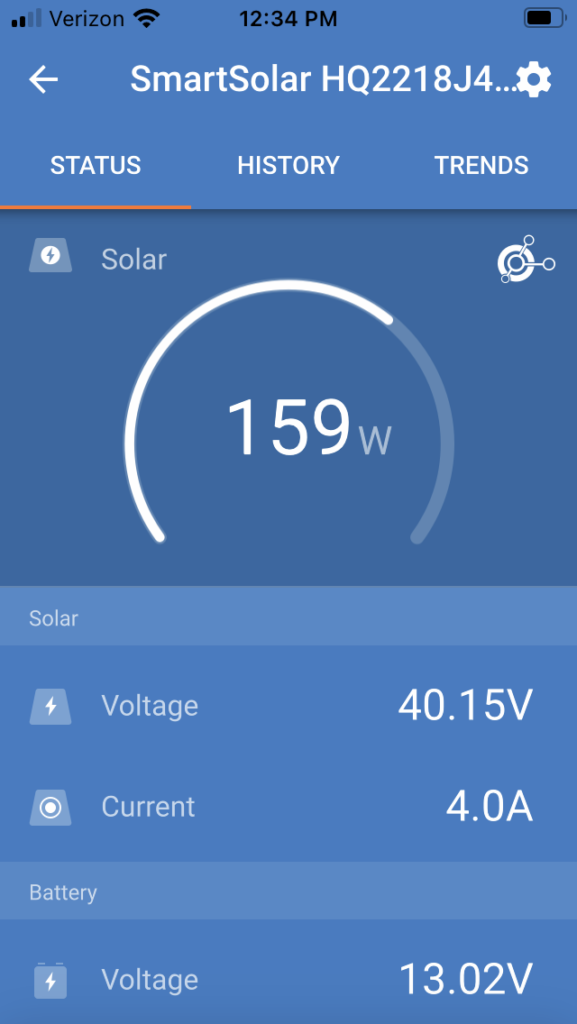

All of a sudden I’m pulling 4A for a total of 159W. That’s about 80% of the rated output. Considering the panels were just leaned on the box (now racked on two pieces of Unistrut) and not at the proper angle I think is a reasonable number. According to my calculations the angle should be 32.2° for March and the angle as you can see in the pic is closer to 40+°. It’s also just a few days into spring so the sun is still low in the sky. All said I’m happy with the results.
Finding a good location for the tracker is going to be harder than I thought. The trees have not yet bloomed and there is a lot of shading all over the place. Spots that are decent for mid day and early afternoon get little morning sun. Going to have to continue to experiment. I also think I need to upgrade the battery. The 20aH lead acid battery is just too small to really run the kind of testing I want. So I’m looking into a 100aH LiFePO4 battery. A 50aH LiFePo4 is probably plenty but the price between the 50 and 100 is so small it’s not worth purchasing the 50. I may also upgrade the inverter with something more efficient. More to come…
Update:
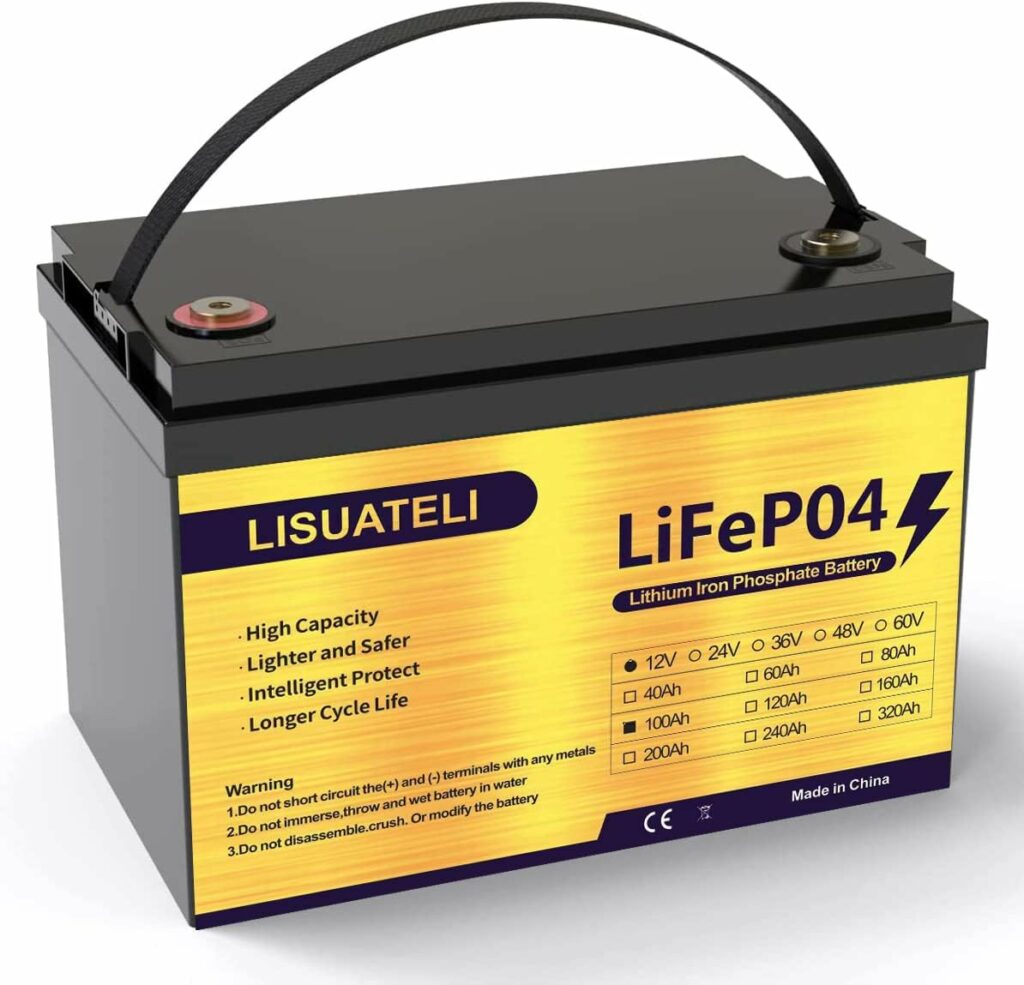
So we have made a few upgrades! The first was the battery. After watching many videos it seems that pretty much all LiFePO4 batteries are made in the same couple of factories in China. Additionally most of the decent budget batteries use the good JDB Battery Management System. I settled on the Lisuateli battery off Amazon. It tied with a couple other batteries as the cheapest. However from the videos some of the other batteries were not using 4 LiFePO4 cells but bundles of 18650s or pouch batteries. The other consideration was it had to have Bluetooth so it could talk to the rest of the system. This battery seemed to fit the bill so I rolled the dice and ordered one.
It arrived in a couple of days. These batteries have to be shipped ground and it made its way over from CA so it took a couple of days. The shipping cost $40! But even with the steep shipping it was still cheaper than the others. The built-in BMS provides overcharged, overdischarged, overcurrent or short-circuited protection as well as cell balancing, low and high voltage cutoff, short circuit protection and temperature protection. This battery weighs in at 24 lbs which is significantly lighter than a comparable lead acid battery. An AGM of the same size and output would weigh in at around 70 lbs. The life of the LiFePO4 is about 10x the AGM, it puts out power for longer and the prices have dropped so much they are very close in price. The only advantage the AGM has is that it works better when cold. LiFePO4 batteries should not be used when the temps are at or near freezing. The BMS in this battery will actually shut it off when it gets too cold.
Speaking of the BMS, there are a number of apps you can use to connect to the BMS and see/control what’s going on with the battery. Below are just a few of the things you are able to do.


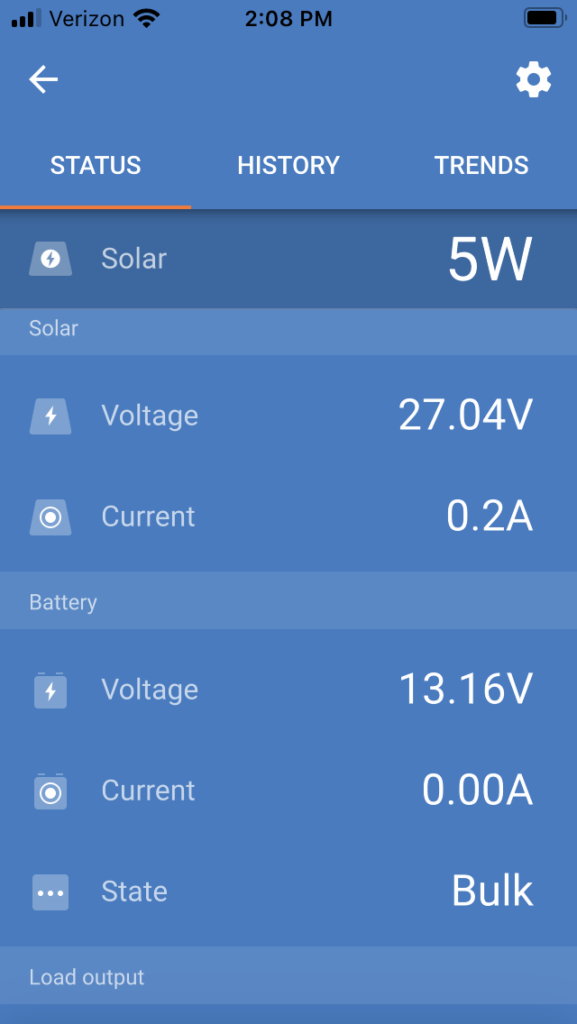
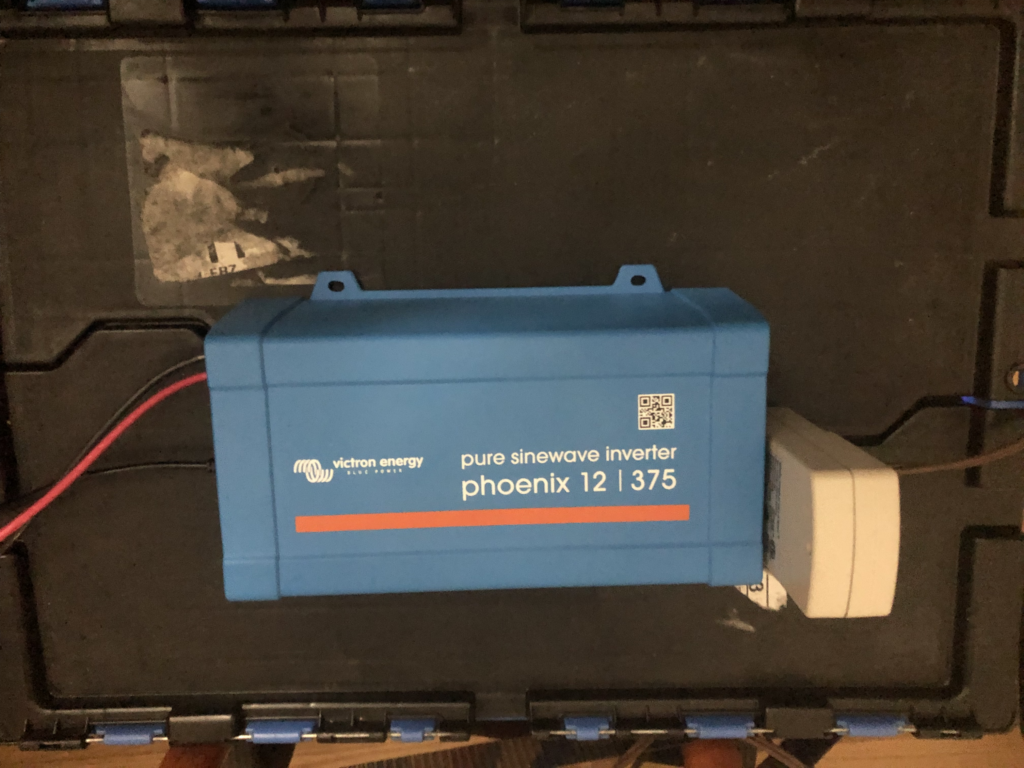
There are all sorts of graphs and settings that can be manipulated to configure the battery for whatever your purpose. The second upgrade was to add a Victron Phoenix 375VA 12V inverter. After using it for a couple of days I love the inverter but wish I had purchased one with more power. The inverter integrates into the Victron system seamlessly. The VenusOS can turn the Phoenix on/off or select the eco mode which greatly reduces the amount of draw when there is no load.

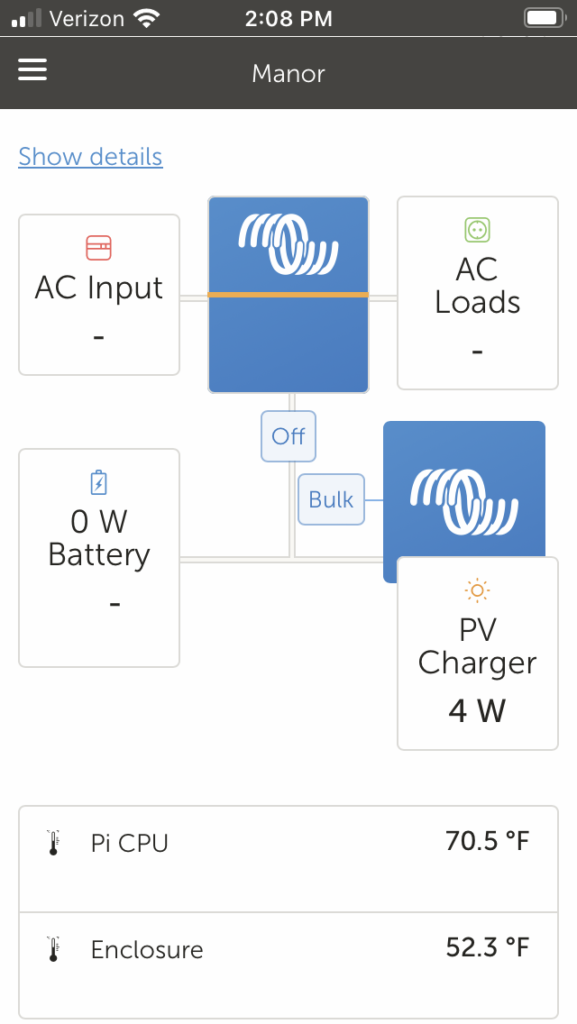
As you can see now there is a AC Load box on the display and in the AES mode you see the ECO designator.
Victron has really done a great job in creating an environment that can quickly show you everything going on with your system. I’m working on some additional improvements such as integrating the Lisuateli/JDM BMS into the VenusOS console. Hopefully I’ll be back soon with some more updates to the system.
Update 2:
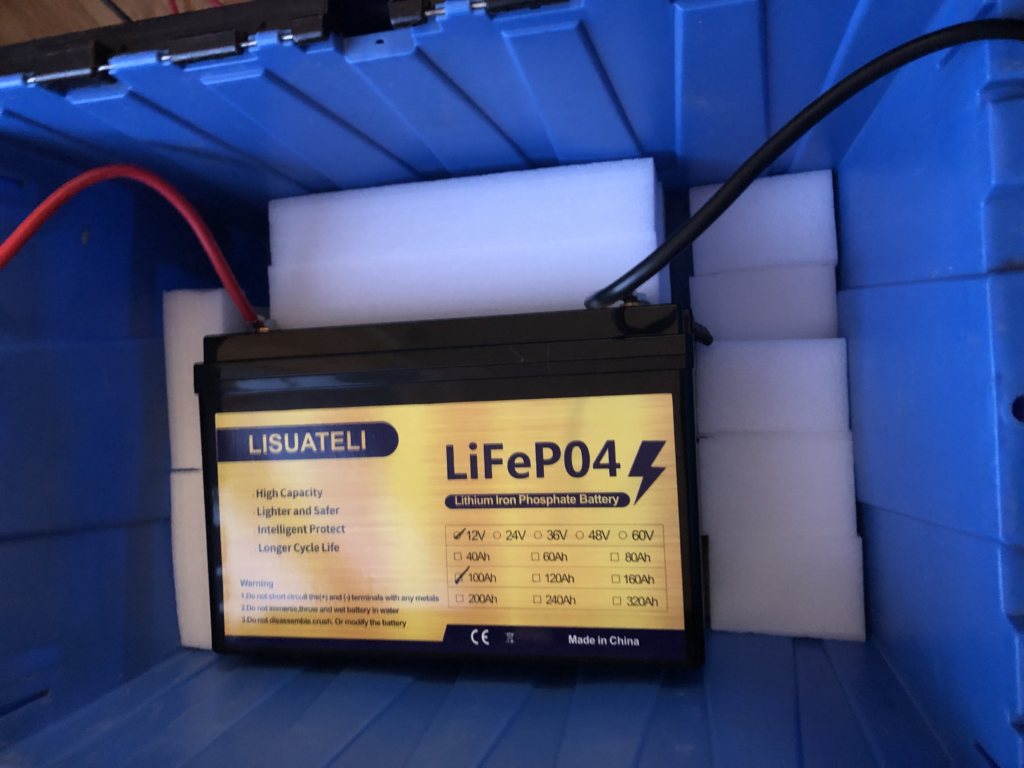
Got some pics of the new set up. In the bottom of the box is the Lisuateli battery. Then on the next level is the Pi, MPPT controller, touch screen display of the Venus OS and some breakers and bus bars. Finally on the top is the Phoenix inverter. I currently have a Kill-A-Watt plugged into it to verify what I’m seeing in Venus OS is correct.
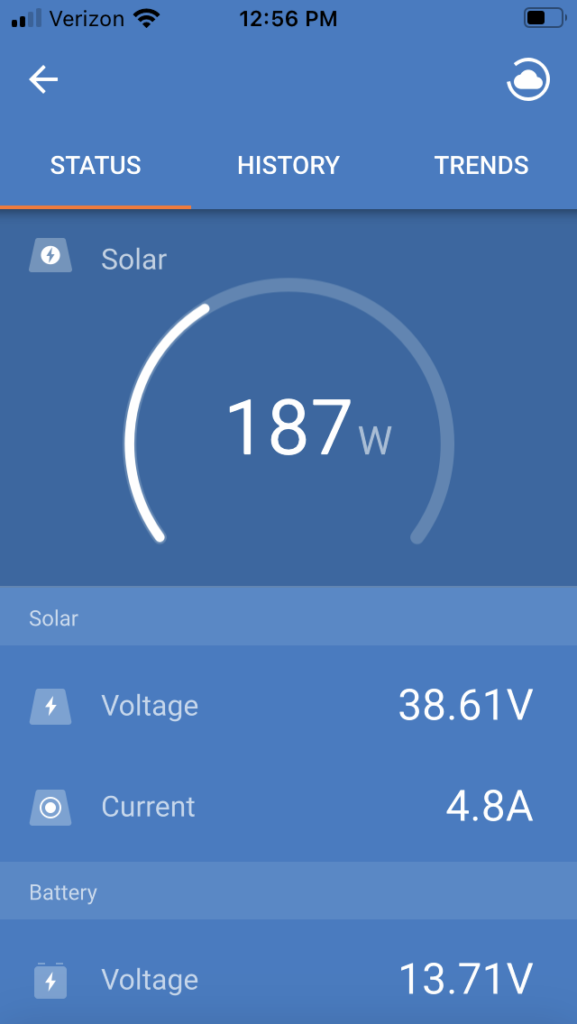
So I rolled out the system onto my deck today (3/16) pretty much where I had it the other day and fired it up. Much to my surprise I was getting 187W! It was really performing well. Part of my upgrade was I replaced the zip wire that I was using from the battery to the inverter and to the breakers with 10-AWG THHN wire. This makes a big difference in voltage and amperage carrying capacity as well as line loss. So my building the test rig is done. Now it’s time to put it to work and find the best locations to install some panels!

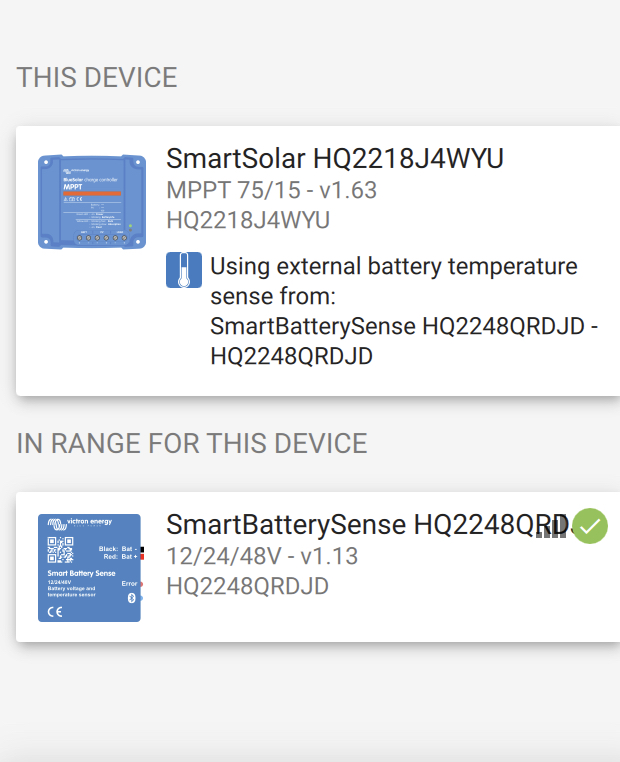
The only thing left to do is to work on the BMS integration into Venus OS. As you can see from the pic, I do have it working. The issue is that there is something wrong with the Pi’s on board Bluetooth as it keeps dropping the connection after a minute or so. It’s super annoying and eventually it just locks up which causes a number of errors in Venus OS. It also causes the MPPT controller to stop charging as it can no longer communicate with the battery. I’m going to try to add a USB Bluetooth dongle and see if an external adapter helps fix the issue. It should also be nice as it will extend the range of the built in Bluetooth. Fingers crossed! But even without it the MPPT controller has default settings that will work just fine for my application.
Update 3 (final?):
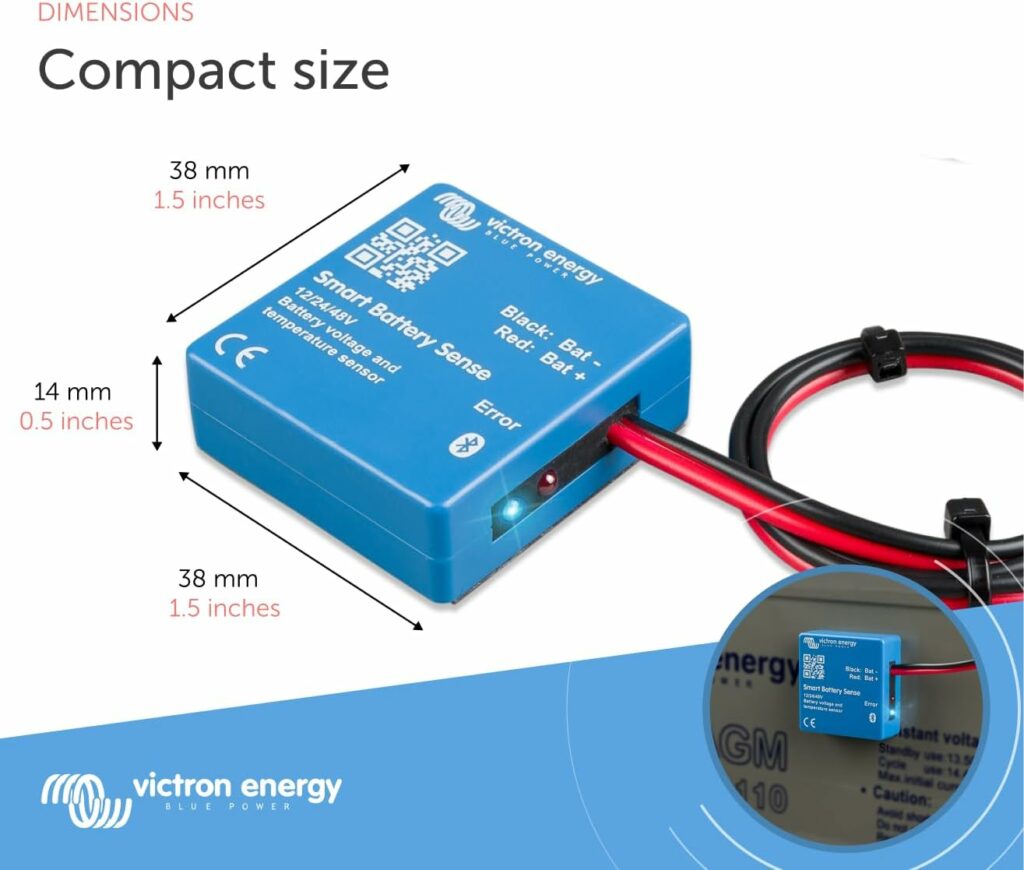
Made some final modifications to this portable solar generator. The Bluetooth connection from the battery BMS is very flakey. I have filed a bug report and others have confirmed similar issues so we are waiting on the devs to look at the issue. In the meantime I added a Victron Smart Battery Sense to the system to provide the voltage and temperature to the rest of the system. The Battery Sense is a small little box the hooks to the battery terminals and sends the data via Bluetooth to the rest of the system. So far so good.
Since I also go in/out of the create often having the Phoenix inverter on to was a pain so I’ve added a board to the back of the dolly and mounted the inverter and a power strip to it. Makes it much easier to plug things in and getting in and out of the create is now no issue. It think this project is now complete. Now just need more sunny days to do testing.


So this project was lot of fun. Learned a lot about solar generation and now have a second one to use around the house. Since I need to discharge the battery in order to charge the panels I’ve been using this setup to power our family room entertainment system including TV, Xbox and other misc devices. This system will run it all for about 16 hours. Pretty cool. For those reading and wondering about cost, will the Victron gear is premium solar equipment. Something like this can be built for a lot less. You could get a MPPT controller off Amazon for about $25-30. The battery shipped will run a little over $200. The inverter depending on how much power you need can run from $20 to $200. Right now the solar panels I’m using are on sale for $69/ea. You will also need some misc wire and small items. So it’s possible to build one of these systems for around $400-500. I’m not 100% sure it’s worth it as you can buy prebuilt solar generators like the Pecron for just a little more. However the solar learning experience and fun I had make it worthwhile to me. I have a lot of plans for future solar expansion including a whole house off grid system, pergola/gazebo with bifacial solar panel roof and more. If you have any questions feel free to drop me a message, happy to help!